
Table of Contents
ToggleInstalling a walk-in shower for elderly family members is one of the smartest aging-in-place upgrades a homeowner can make. Falls in the bathroom send over 230,000 seniors to emergency rooms each year, and the combination of wet surfaces, high tub walls, and awkward transitions creates serious hazards. A well-designed walk-in shower with seat for elderly users eliminates those barriers while preserving independence. This guide walks through the essential safety features, design options, installation requirements, and cost considerations for building or retrofitting a senior-friendly shower that balances accessibility with functionality.
Key Takeaways
- A walk-in shower for elderly users eliminates serious bathroom fall hazards and is one of the most effective aging-in-place modifications homeowners can invest in.
- Essential safety features include non-slip flooring with a DCOF rating of 0.42+, strategically placed grab bars anchored to solid blocking, and a shower seat at 17–19″ height to support mobility and independence.
- Curbless (zero-threshold) showers are the gold standard for elderly accessibility, though low-threshold designs with 2–4″ curbs offer a practical retrofit option when structural constraints apply.
- Professional installation typically costs $4,500–$20,000+ depending on design complexity, with labor accounting for 40–50% of expenses; waterproofing and plumbing work should not be DIY to avoid costly future damage.
- Pairing a walk-in shower with complementary upgrades like handheld showerheads, improved lighting, and lever-style handles creates a comprehensive accessibility solution that preserves dignity and prevents injury.
- Beyond safety, walk-in shower installations with universal design features increase home resale value, making them a smart investment for both daily living and long-term property worth.
Why Walk-In Showers Are Essential for Aging in Place
Traditional bathtubs present multiple fall risks for seniors: stepping over a 14–16″ tub wall, maintaining balance while standing on slippery porcelain, and navigating the transition from wet to dry surfaces. Walk-in showers for seniors eliminate these hazards entirely by removing barriers at the entry point and providing continuous support throughout the bathing process.
A properly designed elderly walk in shower allows wheelchair or walker access, accommodates mobility aids, and reduces the physical strain of daily hygiene routines. For homeowners planning to age in place, a walk-in shower isn’t just a convenience, it’s a critical safety modification that can prevent serious injury and extend independent living by years.
Beyond safety, these installations often increase home resale value. Universal design features appeal to buyers of all ages, and bathroom accessibility ranks high on the list of desirable modifications in markets with aging populations. The investment pays off both in daily use and eventual property value.
Key Safety Features Every Senior-Friendly Walk-In Shower Needs
Safety in an elderly friendly walk in shower with seat for elderly users comes from multiple integrated features working together. Skipping any one element compromises the whole system.
Non-Slip Flooring and Textured Surfaces
Slip resistance is non-negotiable. Standard ceramic tile becomes dangerously slick when wet. For walk-in shower ideas for elderly users, specify porcelain or ceramic tiles with a Dynamic Coefficient of Friction (DCOF) rating of 0.42 or higher, this meets ADA wet surface requirements and provides reliable traction even with soap residue.
Textured stone-look porcelain works well and cleans easier than natural stone. Penny-round mosaics add grip through grout lines but require more maintenance. Avoid polished marble, glazed ceramic without texture, and any tile marketed as “high-gloss.”
Slope the shower floor at 1/4″ per foot toward the drain to prevent standing water, but keep the overall floor level consistent with the bathroom. Puddles create slip hazards: proper drainage prevents them.
Grab Bars, Handrails, and Support Systems
Grab bars must be strategically placed and properly anchored, not added as an afterthought. Plan for:
- Vertical bar near the entry (helps with stepping in and out)
- Horizontal bar on the longest wall at 33–36″ height (provides support while standing or rising from a seated position)
- Angled bar near the showerhead controls (assists with balance while adjusting water)
All grab bars must fasten into solid blocking, typically 2×6 or 2×8 lumber installed horizontally between studs during the framing stage. Toggle bolts and drywall anchors aren’t sufficient: grab bars need to support 250+ pounds of lateral force. Use stainless steel or powder-coated bars with a textured finish to prevent slipping.
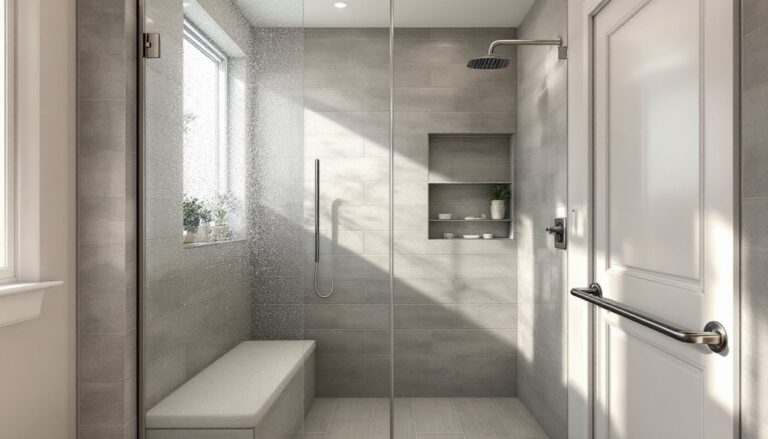
Integrate a built-in or fold-down shower seat at 17–19″ height (standard toilet seat height). Wall-mounted fold-down seats work in tight spaces: tiled built-in benches provide more stability and double as storage for shampoo bottles. Reinforce the seat area with blocking as well.
Choosing the Right Shower Design: Curbless vs. Low-Threshold Options
The entry style defines how accessible the shower actually is. Curbless (zero-threshold) showers sit flush with the bathroom floor, creating a seamless transition perfect for wheelchairs, walkers, and anyone with limited mobility. This is the gold standard for aging in place.
Building a true curbless shower requires careful planning. The shower floor must slope to a linear drain without creating a trip hazard in the rest of the bathroom. In slab-on-grade homes, you’ll often need to raise the entire bathroom floor or recess the shower pan into the slab, both require professional help and possibly engineering review.
In homes with crawl spaces or basements, curbless installation is easier since you can lower the shower subfloor between joists. Use a foam shower pan system designed for curbless applications (Schluter Kerdi-Shower and Wedi Fundo are common choices). These systems include integrated slope and waterproofing, simplifying the installation.
Low-threshold showers use a 2–4″ curb, which is easier to retrofit into existing bathrooms but still creates a small step. This works for seniors with good balance who need a walker but can navigate a modest barrier. It’s a compromise when structural constraints prevent true curbless design.
For walk-in shower ideas for elderly users who also value aesthetics, frameless glass enclosures or partial glass walls maintain openness without water spray issues. Many homeowners consulting design inspiration sources find that clear glass makes small bathrooms feel larger while providing full accessibility.
Installation Considerations and Cost Breakdown
Installing a walk-in shower with seat for elderly users isn’t a weekend DIY project. Expect professional involvement unless you have plumbing, tile, and waterproofing experience.
Permit requirements: Most jurisdictions require permits for shower installations that involve plumbing changes, structural modifications, or electrical work (for added lighting or heated floors). Check local building codes before starting. Unpermitted work can cause issues during home sales or insurance claims.
Typical installation steps:
- Demo existing tub or shower (if retrofitting)
- Frame or modify the shower area and install solid blocking for grab bars and seat
- Rough in plumbing for showerhead, handheld sprayer, and any thermostatic valve upgrades
- Install shower pan system with proper slope and waterproofing membrane
- Tile walls and floor using thin-set mortar and non-slip tiles
- Grout and seal all surfaces (use epoxy grout for mold resistance and easier cleaning)
- Install grab bars, seat, and glass enclosure (if used)
- Finish plumbing fixtures and test for leaks
Cost breakdown (2026 estimates, varies by region and material grade):
- Basic curbless retrofit (60″ x 32″ footprint): $4,500–$7,500 including labor
- Mid-range with custom tile, built-in seat, grab bars: $8,000–$12,000
- High-end with luxury finishes, frameless glass, thermostatic valve: $14,000–$20,000+
Labor typically accounts for 40–50% of total cost. Homeowners researching contractor options and reviews can compare local pricing and vet installers with relevant accessibility experience.
DIY considerations: Experienced DIYers can handle tile work and fixture installation, but hire licensed plumbers for valve placement and drain connections. Waterproofing is critical, one mistake leads to mold, rot, and expensive repairs. If in doubt, hire a professional for the pan and membrane, then tackle finish work yourself.
Additional Accessibility Upgrades to Consider
A walk in shower for seniors works best when paired with complementary bathroom modifications.
Handheld showerhead with slide bar: Allows seated showering and easier rinsing. Look for models with thermostatic mixing valves that prevent sudden temperature swings, scalding is a real risk for seniors with slower reaction times. Install controls at 38–48″ height, reachable from seated and standing positions.
Improved lighting: Add recessed LED fixtures rated for wet locations (IP65 or higher) to eliminate shadows. Seniors need more light than younger adults: aim for 75–100 foot-candles in the shower area. Consider motion-activated lights to prevent fumbling for switches with wet hands.
Comfort-height toilet: If renovating the whole bathroom, install a toilet with a 17–19″ seat height (vs. standard 15″). This matches the shower seat height and makes sitting and standing easier.
Lever-style faucet handles: Replace knobs with lever handles on all fixtures, easier to grip with arthritic hands or when wet.
Curbless bathroom entry: If mobility is severely limited, eliminate the bathroom door threshold as well. Use a flush transition strip or match flooring heights.
For design ideas that balance accessibility with style, many homeowners browse curated remodel galleries to see how modern fixtures and tile choices can create spa-like elderly-friendly spaces without the institutional look.
Maintenance tip: Use epoxy grout in the shower to resist mold and reduce cleaning effort. Seal natural stone annually. Keep a squeegee in the shower and encourage daily use to minimize water spots and soap buildup, regular quick maintenance beats deep cleaning every month.