Table of Contents
ToggleFew kitchen appliances work as hard as a blender, and the Ninja line has earned its reputation for pulverizing everything from ice to fibrous vegetables. But after blitzing a kale smoothie or crushing frozen fruit, the cleanup question looms: can you just toss those parts in the dishwasher, or are you risking damage to blades, gaskets, and plastic containers? The short answer is yes, most Ninja blender components are dishwasher safe, but the details matter. Toss the wrong part onto the bottom rack near the heating element, and you’ll end up with warped lids or dull blades. This guide walks through exactly which parts can handle the dishwasher, how to position them for the best results, and when hand washing is the smarter move.
Key Takeaways
- Most Ninja blender components are dishwasher safe, but only on the top rack—bottom-rack placement risks warping plastic lids, dulling blades, and degrading rubber gaskets due to heat.
- Motor bases must always be hand-washed only, as they contain electrical components that cannot be submerged or exposed to dishwasher cycles.
- Hand washing offers advantages for blade longevity and odor prevention, while the dishwasher excels at sanitizing to temperatures of 140–160°F and handling heavy residue from nut butters or frozen ingredients.
- Proper disassembly, immediate rinsing, upside-down placement, and using gentle cycles with air dry extend the lifespan of your Ninja blender and prevent mold, cloudiness, and persistent odors.
- Silicone gaskets benefit from periodic lubrication with food-grade mineral oil every few months, and worn parts like seals and lids should be replaced proactively rather than waiting for failure during blending.
Understanding Ninja Blender Dishwasher Safety
Ninja blenders are designed with convenience in mind, and the majority of models sold since 2020 include dishwasher-safe components. The company labels most plastic pitchers, lids, and blade assemblies as top-rack dishwasher safe, meaning they can withstand the lower temperatures and gentler spray found on the upper level of a standard dishwasher.
The critical distinction is where you place these parts. High heat from the dishwasher’s bottom heating element can warp BPA-free plastic containers, crack lids, and degrade rubber gaskets over time. Ninja’s user manuals consistently recommend the top rack only for any plastic or rubber components.
Motor bases are always hand-clean only. These house electrical components and can’t be submerged or run through a dishwasher cycle. A damp cloth and mild detergent are all you need for the base, unplug the unit first, and never let water seep into the motor housing or control buttons.
If you’ve misplaced your manual, check the underside of your pitcher or lid. Many Ninja models stamp “Dishwasher Safe – Top Rack Only” directly on the plastic. When in doubt, assume top-rack placement to avoid heat damage.
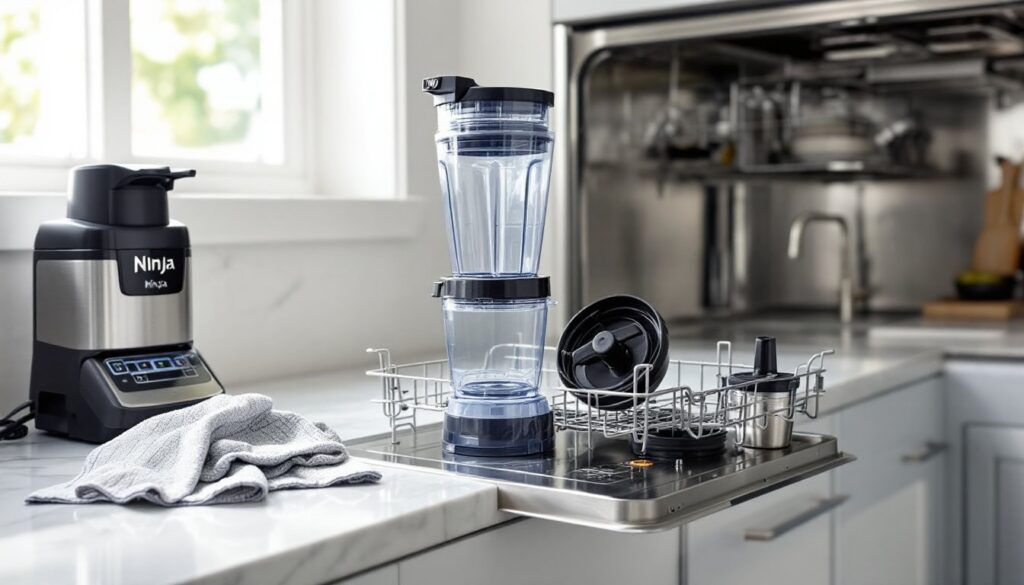
Which Ninja Blender Parts Are Dishwasher Safe?
Most Ninja blenders share a similar construction, so dishwasher compatibility is fairly consistent across the product line. Here’s a breakdown of what can and can’t go in the dishwasher:
Top-Rack Dishwasher Safe:
- Pitchers and single-serve cups: All plastic jars, including the large 72 oz. pitchers and individual Nutri Ninja cups.
- Lids and spout covers: Flip-top lids, pour spouts, and storage lids with silicone gaskets.
- Blade assemblies: Stacked blade units and extractor blades, though hand washing extends their sharpness (more on that below).
- Silicone gaskets and seals: Rubber rings that sit between the blade assembly and pitcher.
Place these components upside down or angled to allow water to drain fully. Trapped moisture in crevices can lead to mold or odors, especially around gaskets.
Components You Should Never Put in the Dishwasher
Certain parts of a Ninja blender will suffer permanent damage if exposed to dishwasher heat, water pressure, or detergent:
- Motor base: The electrical heart of your blender. Wipe it down with a damp microfiber cloth and dry immediately. Use a toothbrush dipped in soapy water to clean around buttons and seams.
- Blade assemblies with metal bearings (select models): Some older or commercial-grade Ninja models have sealed bearings in the blade housing. High heat can degrade the lubricant. Check your manual, if it lists the blade assembly as hand-wash only, skip the dishwasher.
- Insulated or double-walled cups: A few Ninja models include stainless-steel-lined cups for temperature retention. Dishwashing can compromise the vacuum seal between walls, reducing insulation performance.
When you’re setting up a kitchen organization system, keeping a designated drying mat near the sink for hand-wash-only components saves time and prevents accidental dishwasher mistakes.
Best Practices for Dishwasher Cleaning Your Ninja Blender
Loading a Ninja blender correctly protects parts and ensures a thorough clean. Follow these steps for best results:
- Rinse immediately after use. Pulverized greens, nut butters, and frozen fruit dry into a cement-like film if left sitting. A 10-second rinse under hot water prevents most stubborn residue.
- Disassemble completely. Remove the blade assembly from the pitcher, separate lids from gaskets, and pull out any removable seals. Trapped food under a gasket won’t get clean if the parts stay assembled.
- Position on the top rack, upside down. Flip pitchers and cups so water drains out rather than pooling inside. Angle lids to expose the underside.
- Use a gentle cycle and skip heated dry. High-temperature wash cycles and heated dry settings accelerate plastic wear. Select a normal or light wash with air dry if your dishwasher offers it.
- Space parts to allow water flow. Jamming too many blender components into one load blocks spray jets. If you’re running multiple pitchers and lids, consider splitting them across two cycles.
Safety note: Always handle blade assemblies with care, even when loading the dishwasher. The stainless-steel blades are sharp enough to slice through fingertips. Grip by the plastic housing, not the blades themselves, and wear cut-resistant gloves if you have a history of kitchen cuts.
Avoid abrasive dishwasher detergents that contain bleach or lemon extracts, they can cloud clear plastic over time. Stick with a standard powder or pod designed for plastics.
Hand Washing vs. Dishwasher: What Works Best?
While Ninja blenders are dishwasher safe, hand washing offers some advantages, especially if you blend daily or use the same container multiple times in a morning.
When to choose hand washing:
- Speed: A quick scrub with dish soap and a bottle brush takes under a minute for a single-serve cup. If you’re making back-to-back smoothies, rinsing between uses is faster than waiting for a dishwasher cycle.
- Blade longevity: Dishwasher detergents are mildly alkaline and can dull stainless-steel edges over time. Hand washing with gentle dish soap preserves sharpness, especially important for blending ice or frozen ingredients.
- Odor prevention: Some ingredients, garlic, turmeric, curry powders, leave persistent smells in plastic. Hot water and baking soda scrubbing tackle odors more effectively than a standard dishwasher cycle.
- Gasket care: Silicone seals last longer when hand washed. Dishwasher heat can make them brittle or cause them to lose their grip, leading to leaks during blending.
When the dishwasher is the better choice:
- Heavy residue: Nut butters, protein powders, and thick smoothie bowls benefit from the sustained spray and heat of a dishwasher. Hand scrubbing doesn’t always reach every crevice in a blade assembly.
- Sanitization: Dishwashers reach temperatures around 140–160°F during the rinse cycle, which kills bacteria more effectively than most sink water. If you’re blending raw eggs, meat-based broths, or other high-risk ingredients, the dishwasher adds a layer of food safety.
- Batch cleaning: If you’re prepping multiple smoothie packs or running a juicing session, loading all the components into the dishwasher saves time over individually scrubbing each piece.
Many experienced home cooks adopt a hybrid approach outlined in decluttering guides: hand rinse after each use, then run a deep dishwasher clean once a week to sanitize and remove buildup.
How to Extend the Life of Your Ninja Blender
Proper cleaning is just one piece of blender longevity. These additional practices keep your Ninja running smoothly for years:
Lubricate gaskets periodically. Every few months, remove silicone seals and rub a thin layer of food-grade mineral oil or coconut oil onto the rubber. This prevents cracking and maintains a watertight seal. Let the oil sit for 10 minutes, then wipe off the excess before reassembling.
Inspect blades for damage. Check the stainless-steel blades for chips, bends, or dull spots every month. If you notice reduced blending performance, chunky smoothies, uneven crushing, order a replacement blade assembly from Ninja or an authorized parts supplier. Aftermarket blades often use lower-grade steel and can fail prematurely.
Store with lids off. Trapped moisture between the pitcher and lid creates an ideal environment for mold, especially in humid climates. Store lids and pitchers separately, or leave lids propped open to allow airflow.
Avoid thermal shock. Don’t pour boiling liquids directly into a cold plastic pitcher, and don’t transfer a pitcher from the freezer straight to a hot-water rinse. Rapid temperature changes can crack plastic or weaken seams. Let containers come to room temperature before washing or filling.
Replace worn parts proactively. Gaskets, lids, and blade assemblies are consumables. If a lid no longer seals tightly, or a gasket shows cracks, replace it before it fails mid-blend and creates a mess. Ninja sells replacement parts individually, so you don’t need to buy an entirely new blender.
If you’re comparing blender performance and maintenance, personal blender reviews often highlight durability and ease of cleaning as key decision factors alongside blending power.
Troubleshooting Common Cleaning Issues
Even with careful washing, blender owners encounter a few recurring problems. Here’s how to address them:
Cloudy or discolored plastic: Over time, high-fat ingredients (avocado, nut butters) and pigmented foods (berries, beets) stain polycarbonate pitchers. Soak the pitcher overnight in a solution of 1 tablespoon baking soda and 2 cups warm water, then scrub with a non-abrasive sponge. For stubborn cloudiness, fill the pitcher halfway with white vinegar, add water to the top, and let it sit for an hour before rinsing.
Persistent odors: If your pitcher smells like old smoothies no matter how much you wash it, try this trick: fill the pitcher with warm water, add the juice of one lemon and a tablespoon of baking soda, then pulse the blender on low for 30 seconds. The agitation reaches areas a sponge can’t. Rinse thoroughly and air dry.
Blades won’t come clean: Sticky residue clings to the underside of blade assemblies, especially in the crevices around the central hub. Use a small bottle brush or an old toothbrush dipped in dish soap to scrub these tight spots. For dried-on buildup, soak the blade assembly in hot, soapy water for 15 minutes before scrubbing.
Gasket slipping or leaking: If the rubber seal keeps popping out during blending, it’s either worn out or not seated correctly. Remove the gasket, inspect it for cracks or stretching, then press it firmly back into the groove. If it continues to slip, order a replacement, gaskets typically last 1–2 years with regular use.
Dishwasher leaving white film: Hard water deposits can coat plastic in a chalky residue. Run an empty dishwasher cycle with a cup of white vinegar on the top rack to clear mineral buildup from the spray arms. For the blender parts themselves, wipe down with a vinegar-soaked cloth, then rinse.
Mold in the lid or gasket: If you spot black spots, disassemble the lid completely and soak all components in a 1:1 mix of water and white vinegar for 30 minutes. Scrub with a brush, rinse, and dry thoroughly. Going forward, always store lids off or propped open to prevent moisture buildup.
Most cleaning issues stem from incomplete disassembly or skipping the immediate rinse after blending. Make it a habit to rinse all parts within 5 minutes of use, and you’ll avoid 90% of stubborn residue problems.