Table of Contents
ToggleGetting dressed in a dim bathroom or wrestling with shadows while putting on makeup isn’t just annoying, it’s a sign the vanity light is doing a terrible job. The fixture mounted above or beside the mirror is one of the hardest-working elements in any bathroom, yet it’s often an afterthought during renovations. A well-chosen vanity light eliminates shadows on the face, provides even illumination for grooming tasks, and sets the tone for the entire space. Whether replacing a builder-grade strip light or wiring a fixture in a brand-new bathroom, understanding the options and installation requirements makes the difference between a functional upgrade and a frustrating mistake.
Key Takeaways
- A bathroom vanity light eliminates shadows on the face and provides even illumination essential for grooming tasks like makeup application and shaving.
- Bathroom vanity lighting should deliver 70-80 lumens per square foot with a color temperature of 3000K-4000K to ensure accurate color rendering and natural skin tones.
- Bar lights work best over wider mirrors or double vanities, while sconces mounted at face height (60-65 inches from floor) on either side of the mirror offer the most flattering task lighting.
- When selecting a bathroom vanity light fixture, match the width to approximately 75% of your mirror width and ensure the finish coordinates with other hardware like faucets and cabinet pulls.
- Replacing an existing bathroom vanity light is a manageable DIY project, but adding new fixtures requires running electrical cable through walls and may need local permits and GFCI protection compliance.
Why Bathroom Vanity Lighting Matters
Vanity lighting isn’t about ambiance, it’s about function. The primary job is to illuminate the face from the front, eliminating shadows under the eyes, nose, and chin that overhead lighting creates. Poor vanity lighting makes grooming tasks difficult, from shaving and applying makeup to checking skin conditions or putting in contact lenses.
Beyond task lighting, the vanity fixture plays a major role in the bathroom’s overall aesthetic. It’s often the most prominent light source and can reinforce design choices, industrial pipe sconces in a farmhouse bath, sleek chrome bars in a modern space, or ornate fixtures in a traditional setting.
Brightness and color temperature matter more here than in most rooms. Bathrooms need higher light levels (70-80 lumens per square foot) compared to living areas. Color temperature between 3000K and 4000K (warm to neutral white) provides accurate color rendering without the harsh, blue-tinged light of daylight bulbs. This range helps ensure makeup colors look true and skin tones appear natural.
Fixture placement also impacts performance. A single overhead light, even a bright one, casts shadows downward. Vanity lights mounted at eye level or slightly above, flanking or spanning the mirror, provide even, shadow-free illumination.
Types of Bathroom Vanity Lights
Vanity lights fall into a few main categories, each with specific benefits and installation considerations.
Bar Lights and Multi-Light Fixtures
Bar lights (also called bath bars or vanity strips) mount horizontally above the mirror and hold multiple bulbs in a single linear housing. Standard sizes range from 24 to 48 inches, with 3 to 6 bulbs. These fixtures work well over wider mirrors or double-sink vanities, distributing light evenly across the entire width.
Bar lights typically mount directly to a standard electrical box, making them straightforward to install. They come in styles ranging from exposed Edison bulbs on simple metal bars to frosted glass shades that diffuse light and reduce glare. When choosing a bar light, match the fixture width to roughly 75% of the mirror width for balanced proportions.
Multi-light fixtures include designs like globe clusters, industrial cage lights, or modern geometric shapes. These provide design flexibility but require careful attention to bulb choice, exposed bulbs should be low-wattage or LED to avoid glare, while frosted or opal glass shades soften the output.
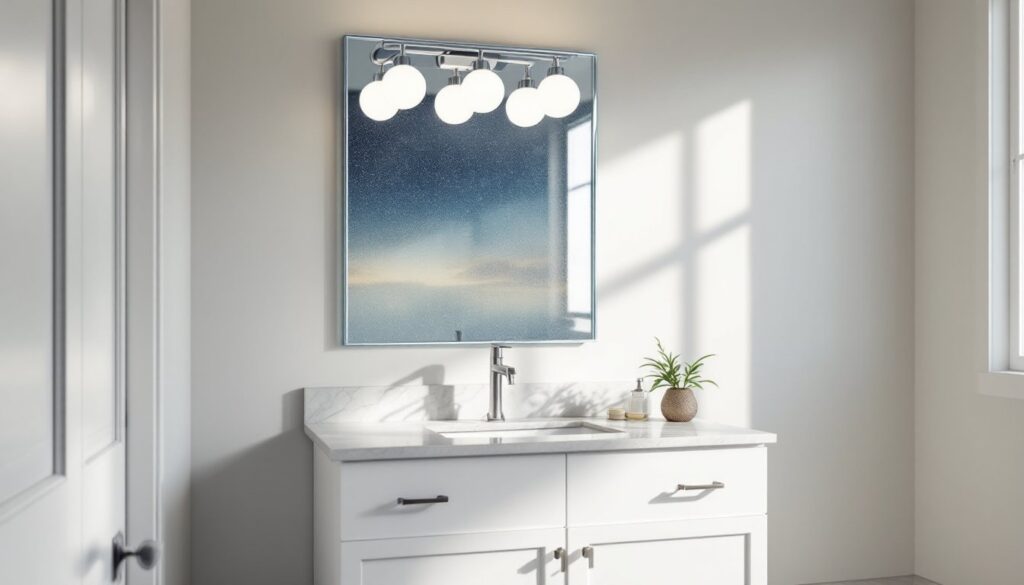
Sconces and Wall-Mounted Options
Wall-mounted sconces installed on either side of the mirror offer the most flattering task lighting. Placing fixtures at face height (roughly 60 to 65 inches from the floor) and spaced 36 to 40 inches apart provides even, shadow-free illumination. This setup mimics professional makeup lighting and works particularly well for single-sink vanities with narrower mirrors.
Sconce installation requires two electrical boxes, one on each side of the mirror, which means more complicated wiring if boxes aren’t already in place. This often involves opening walls, running cable, and patching drywall. For remodels, plan sconce placement before hanging the mirror to avoid conflicts with mirror edges or medicine cabinets.
Backlit mirrors and integrated LED strips offer a modern alternative, though they’re technically mirror upgrades rather than standalone fixtures. These work well as supplemental lighting but often don’t provide enough task-focused brightness on their own.
How to Choose the Right Vanity Light for Your Bathroom
Start with the mirror dimensions and vanity width. For single sinks with mirrors 30 inches wide or less, a centered bar light works fine. For wider mirrors or double vanities, consider either a longer bar light (36 to 48 inches) or a pair of sconces.
Next, assess the ceiling height and existing lighting. Standard 8-foot ceilings work fine with bar lights mounted 75 to 80 inches from the floor (typically 6 to 8 inches above the mirror). Higher ceilings may benefit from sconces at face level to prevent the fixture from feeling too distant.
Match the fixture finish to other hardware in the bathroom, faucets, cabinet pulls, towel bars. Common finishes include brushed nickel, matte black, chrome, and oil-rubbed bronze. Mixing metals can work if done intentionally, but keeping vanity light finishes consistent with the faucet creates a cohesive look.
Bulb compatibility matters. Many modern fixtures use integrated LEDs, which offer long life and energy efficiency but can’t be replaced if they fail, the entire fixture needs replacement. Traditional socket-based fixtures accept standard bulbs (E26 base), giving flexibility to adjust brightness and color temperature over time.
Check the IP (Ingress Protection) rating if the fixture will be installed near the shower or tub. Damp-rated fixtures handle humidity, while wet-rated fixtures withstand direct water exposure. Most vanity lights are damp-rated, suitable for typical bathroom conditions.
For those researching fixture styles and proportions, design platforms like Remodelista offer curated examples across various bathroom types. Budgets vary widely, basic builder-grade bar lights start around $50, while designer sconces and custom fixtures easily exceed $300 per fixture.
Installing Your Bathroom Vanity Light: A DIY Guide
Replacing an existing vanity light on a standard electrical box is a manageable DIY project for most homeowners. Installing new fixtures where none existed requires running cable through walls and may need a permit depending on local codes.
Safety first: Turn off power at the breaker panel, not just the light switch. Use a non-contact voltage tester to confirm the wires are dead before touching anything.
Tools and materials needed:
- Non-contact voltage tester
- Screwdriver (Phillips and flathead)
- Wire strippers
- Wire nuts (typically included with fixture)
- Ladder or step stool
- Safety glasses
Step-by-step installation:
-
Remove the old fixture. Unscrew the mounting plate or canopy, then disconnect the wire nuts joining fixture wires to house wires. Most vanity lights connect black (hot) to black, white (neutral) to white, and bare copper or green (ground) to the ground wire or box.
-
Inspect the electrical box. Standard vanity lights mount to a 4-inch round or octagonal box. The box should be securely fastened to a stud or blocking. If the box is loose or damaged, it needs repair before mounting a new fixture, vibration and weight can cause loose boxes to fail over time.
-
Attach the mounting bracket. Most fixtures include a crossbar or strap that screws into the threaded holes on the electrical box. Align it level and tighten the screws.
-
Connect the wires. Match fixture wires to house wires: black to black, white to white, and ground to ground. Twist the bare ends together clockwise, then thread a wire nut over each connection and tighten until secure. Tug gently to confirm, connections shouldn’t pull apart. Tuck the wires into the box.
-
Mount the fixture. Align the fixture base or canopy with the mounting bracket and secure with screws. Some fixtures hang on a threaded nipple and lock with a collar nut. Follow the manufacturer’s instructions.
-
Install bulbs and test. Thread in the appropriate bulbs (check wattage limits printed on the fixture), restore power at the breaker, and flip the switch.
For those adding sconces where no boxes exist, this involves cutting drywall, running 14/2 NM cable (for 15-amp circuits) from an existing junction box or switch, installing new electrical boxes, and patching/painting walls. This level of work is best tackled by someone comfortable with basic electrical work or a licensed electrician. Family Handyman offers detailed wiring tutorials for various electrical projects if tackling the job independently.
Common mistakes to avoid:
- Choosing a fixture too small for the mirror, it looks undersized and doesn’t provide enough light.
- Installing bar lights too high, mount them low enough to illuminate the face, not just the top of the head.
- Skipping the ground connection, always connect the ground wire to reduce shock risk.
- Over-tightening screws on the fixture, which can crack glass or plastic components.
Permits and codes: Replacing a fixture on an existing box typically doesn’t require a permit. Running new wiring or adding circuits usually does, and work must meet National Electrical Code (NEC) standards and local amendments. Bathroom lighting circuits must be GFCI-protected if within 6 feet of a water source per NEC 210.8(A). When in doubt, check with the local building department.
Conclusion
A well-chosen vanity light transforms a bathroom from poorly lit and frustrating to functional and flattering. Whether installing a bar light over a single mirror or mounting sconces for balanced task lighting, the right fixture choice and proper installation make daily grooming tasks easier and enhance the overall design. Take time to measure carefully, match finishes to existing hardware, and ensure safe, code-compliant wiring, it’s the kind of upgrade that pays off every single day.